Showing posts with label 2014 finishes. Show all posts

Friday, January 2, 2015

Roundup of Random Crap I Made and Forgot to Blog

Who doesn't love a catchy blog post title, amirite?

Anyway, there were a few things I made this past quarter that I didn't make time to blog about, so here's a quick compilation:

1. Elsa Costume. My child was one of the legion of kids dressed as Elsa this Hallowe'en. She was absolutely thrilled with the costume, and I was happy too.


2. Mugrug for my Boss.  Terrible cellphone photo but you can kind of see the subtle design I quilted on here. It's a large dandelion with floating seeds and it says "wish."


I was inspired by this mug she uses with a similar image that says "some see weeds, others see wishes."


3. Clothing for Léonie, G's new doll:
I made a matching one for G


For the top and leggings, I used Rachael Imagine Gnats' wonderful free patterns (Eva pants and Chloe tee). If you plan to make these pants, I recommend assembling them slightly differently than the tutorial suggests - rather than sewing the inseams together first, start by sewing the front and back seams from waist to crotch. Then sew the leg seams together from ankle to ankle in one long seam. Much less fussy.

A couple of these makes were on my Q4 FAL goal list so big yay for that! 

I've got one more project to blog about plus my Q4 FAL roundup plus my Q1 2015 Finish Along goals. Stay tuned!

Tuesday, December 30, 2014

Pastel Curves: a Final Finish for 2014

Hello! I've been thoroughly enjoying my holidays this Christmas. I'm off work and we've been having lots of fun as a family. I hope your holidays were merry and bright.

I'd like to share my final quilty finish of 2014 - Pastel Curves.
Pastel Curves

I finished up this mini quilt in late November, in time to submit it to the QuiltCon show as part of the Michael Miller Spring Cotton Couture Challenge (it wasn't accepted).

The palette of pastels was outside my normal colour range, and I ended up sticking to just three of the six colours in the bundle. The fabrics themselves are very fine - quite thin, actually. In the lighter pastel shades, there was a lot of show-through of the seam allowances. Using a white batting helped but not entirely. I probably won't choose these again, not that it's likely anyway since Cotton Couture solids don't seem to be available in Canada.

Pastel Curves_detail

I wanted a design with a fair bit of negative space so I could continue to work on my FMQ skills. I tried a few different motifs, and because I used some lovely Aurifil 50 weight thread in white, it blended in beautifully while highlighting all the quilty texture. I'm really pleased!

Pastel Curves feather

The curved pieces were created using Julie Distant Pickles' template intended for her Mod Pop and Tunnel Vision patterns. I hoped to be able to use it to cut the convex curve on the corner of a larger piece of fabric, so I could then piece on the concave piece, and it worked!

Pastel Curves feather

For the label, I applied fusible web to the back of one of my labels, then cut it with pinking shears. I jotted the quilt's information inside the letters - I kind of like the effect, actually.

Pastel Curves label

This measures about 23" square, and it'll hang in my mother-in-law's room at the care home she recently moved into.

This is a Finish Along finish (that's a link to my Q4 goal list)! Hooray! Even though I didn't finish a lot of what I intended to in 2014, I loved the camaraderie and motivation of the Finish Along - think about joining us for 2015, when it will be hosted by Adrianne On the Windy Side!

Finish Along 2014


Sunday, November 30, 2014

Rainbow in the Round

Rainbow in the Round_full

Isn't this just the happiest quilt you've ever seen? The Vancouver Modern Quilt Guild did a Round Robin quilt activity this year, organized by yours truly. I modeled it on something similar we did in my former guild called "tinners". Participants put their starting block (or row), a journal and a focus fabric in a tin, then each month we got a tin to work on, based on that month's instructions.

The Round Robin worked similarly. We started with a centre block, then each month, instructions were posted on the VMQG blog for how many borders to add, how big they were to be, plus a theme (stars, triangles, curves, etc.). Some folks opted to include some fabric they wanted used throughout the quilt, and others didn't.

My starting "block" was a green scrappy square I made using the slab technique outlined in Sunday Morning Quilts. I asked that each month's additions be monochromatic and scrappy, with the colour being up to the contributor.

Green slab starter block

I was so happy with my quilt that I went home and almost immediately got to work adding a few more borders to increase its size (I added the red and yellow to complete the rainbow, plus the wide black and white border to contain it all).

I quilted it simply, with straight lines about 2" apart using my walking foot, then FMQ'd in between with Christina A Few Scraps' "beads on a string" design from her Craftsy class (more on that in another post).

Rainbow in the Round quilting

I wasn't too sure what colour thread to choose since this quilt has ALL THE COLOURS so I chose white Aurifil 50 weight thread and it worked perfectly, I think. The 50 weight means it's nice and fine and it blended surprisingly well. 

Rainbow in the Round detail

I chose green for the binding to echo the centre, where it all began. The quilt is 64"x75" before washing - we'll see how much it shrinks up. I entered it in the QuiltCon show, so we'll see whether it's accepted. In any case, I'm looking forward to snuggling under it as the holiday season approaches.

Rainbow in the Round

Sunday, November 23, 2014

Naramata Summer

For the past few summers, my family and I have spent a week or so in the Okanagan - a beautiful area about 4 hours' drive from Vancouver. Much of the fruit we eat in BC is grown in the Okanagan Valley and no trip there is complete without stopping at many fruit stands to buy juicy peaches and other scrumptious fruit.

This past summer, we stayed on the grounds of a fruit winery in Naramata BC and it was fabulous. Because we were there toward the end of the summer, picking season was in full swing. One day I was walking along the road beside the orchard and noticed a few stacks of pallets awaiting their tour of duty holding the big bins of picked fruit. The pallets were mostly brown but two were this bright blue. I didn't have a camera with me but I sketched what I saw, knowing one day it would turn into a quilt. Amazingly, it did, and in record time, too! This is Naramata Summer.

Naramata Summer front

She's about 31"x29" and made entirely of scraps/stash fabric: Robert Kaufman Essex Linen in (I think) Natural, some Kona cotton in some colours I can't remember but they're left over from my Oceanic Supernova, and Kona Stone.

Naramata Summer quilting

The quilting? Well let me tell you about the quilting. I was all set to make this a quick finish with some straight line quilting and call it a day. The short-sightedness of that plan was pointed out to me at my annual Loon Lake retreat, where I had registered for a short workshop with Krista Withers - a preview of the one she's teaching at QuiltCon on Compositional Quilting, an approach to quilting the negative space found in many modern quilts. Thank goodness I have friends who will kick my ass around the block when needed.

Naramata Summer quilting back_
Because in that workshop? Mind: BLOWN. Seriously. I'll never look at quilting the same way again, and even though we didn't sew one stitch in the workshop, my Free Motion Quilting game was upped *significantly*. I didn't realize I had this in me:

Naramata Summer quilting back

I'm so happy I waited. SO so happy. I will enter this in the QuiltCon quilt show but even if it doesn't get in, I'm extremely proud of the work I've done on this quilt: the design, the execution and the quilting (which was done with Aurifil 40 weight in a lovely turquoise (5006)).

Naramata Summer

And one last full frontal just because:

Naramata Summer Front_

Friday, October 24, 2014

Bloggers' Quilt Festival Fall 2014: Liberty Goes to the Circus

I do so enjoy the Bloggers' Quilt Festival hosted by Amy Ellis twice a year at Amy's Creative Side. She rounds up great sponsors and creates a fantastic online quilt show for our viewing and inspiration. It's wonderful!

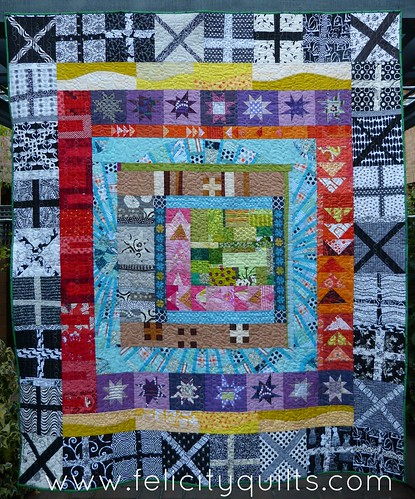
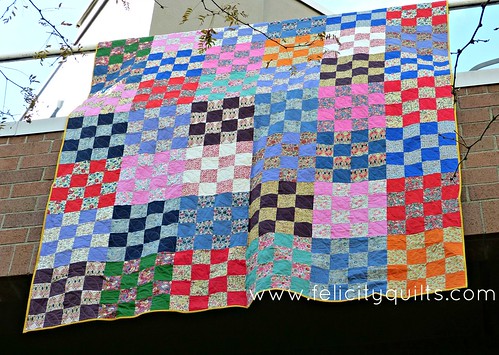
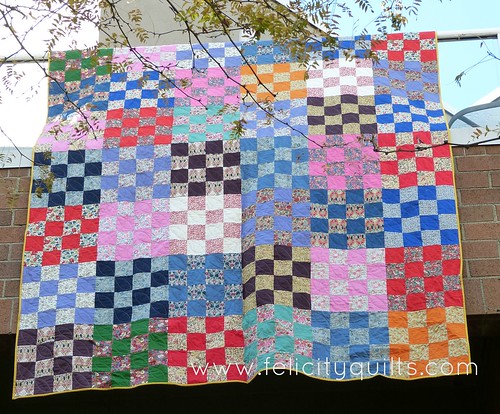
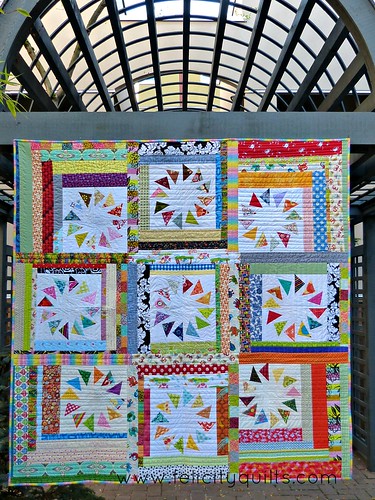
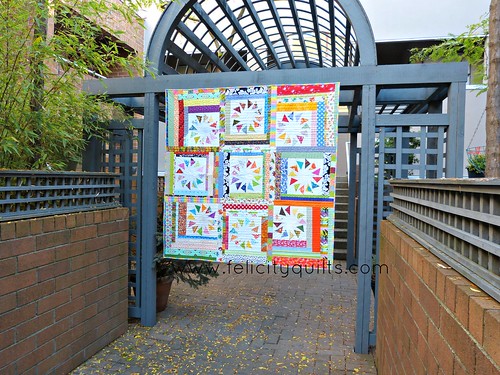
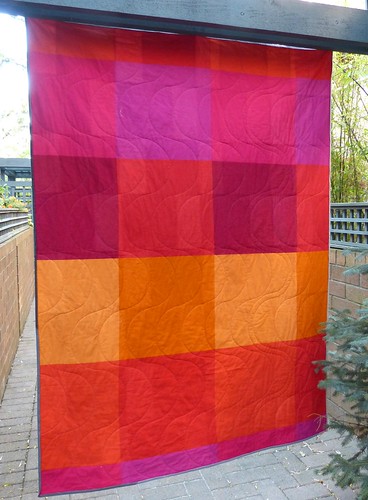
My BQF entry this year - in the Large Quilt category - is called Liberty Goes to the Circus.

Liberty Goes to the Circus_

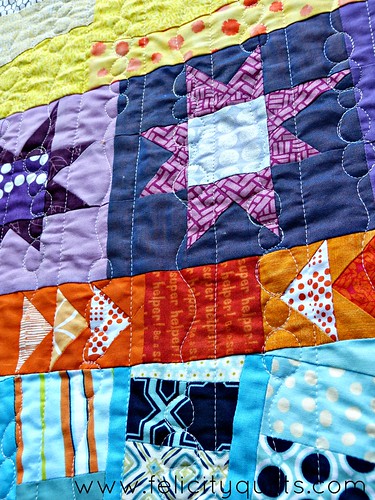
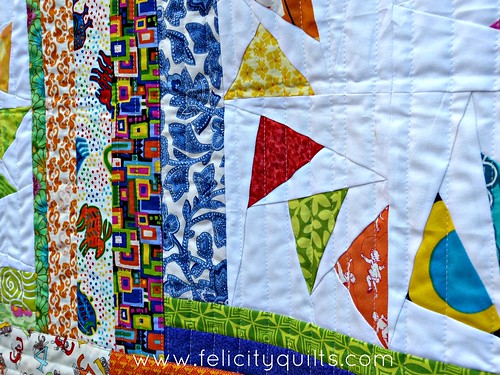
I was gifted a half-dozen packages of Liberty of London tana lawn fat quarters by my neighbour who's in the clothing design business. He'd had them hanging around in his office for a while and one day offered them to me. I could barely squeak out a thank you, knowing what I did about how precious Liberty fabric is.

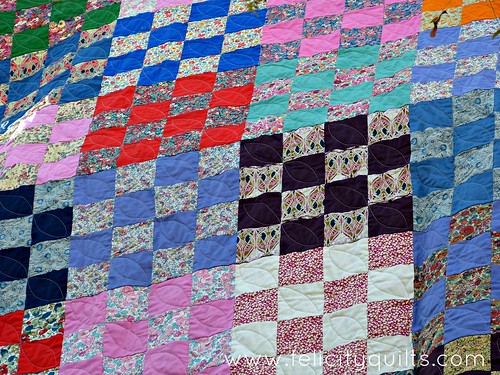
I paired each FQ with a coordinating Kona solid...

Liberty plus Kona solids quilt status: fabrics paired up. #squee #liberty #wip

...and used this 
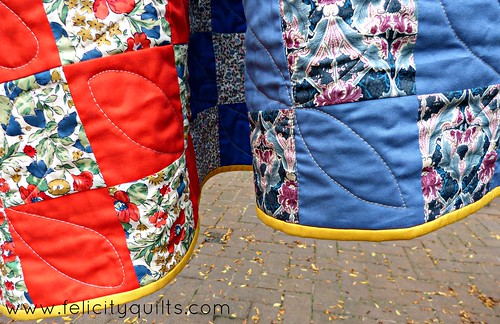
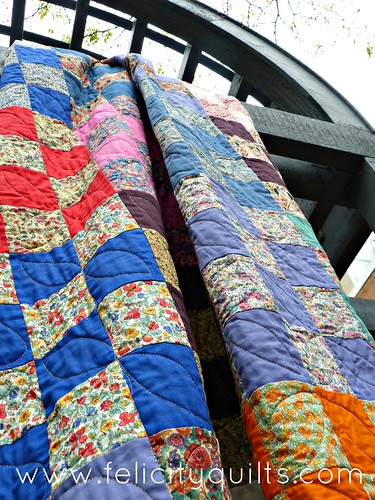
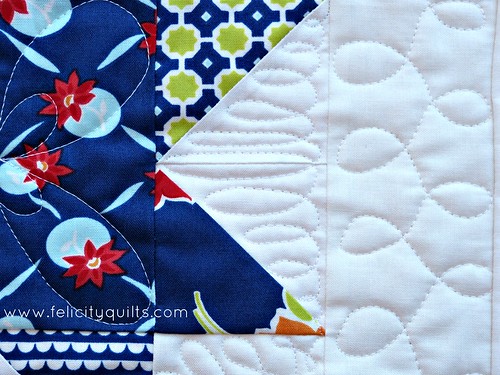
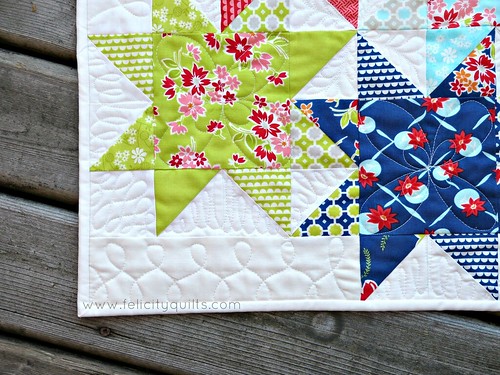
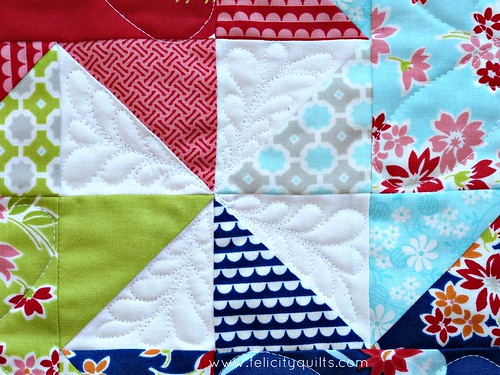
tutorial to create a total of 42 St. Louis 16-patch blocks. I hoped that the brightness of the solids would unify the disparate patterns and backgrounds of the various Liberty fabrics.

Liberty Goes to the Circus quilting

I do believe the solids did their job of unifying the whole thing. Having said that, however, I'm reminded of my sister and brother-in-law's first home that had different coloured carpet in every room in the house (colours included burgundy, purple and royal blue) and she commented that it seemed like the previous owners used "Circus" as inspiration when they were choosing their décor theme. Which is why I'm calling this Liberty Goes to the Circus.

Liberty Goes to the Circus hanging

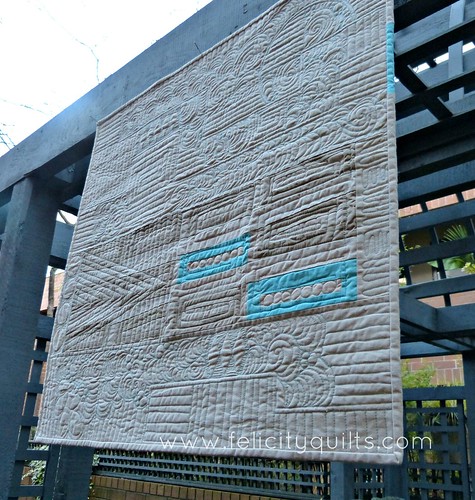
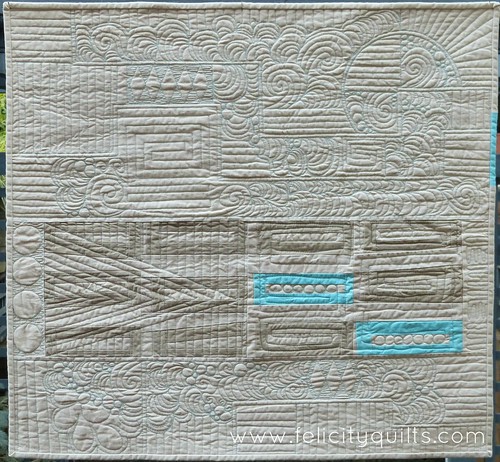
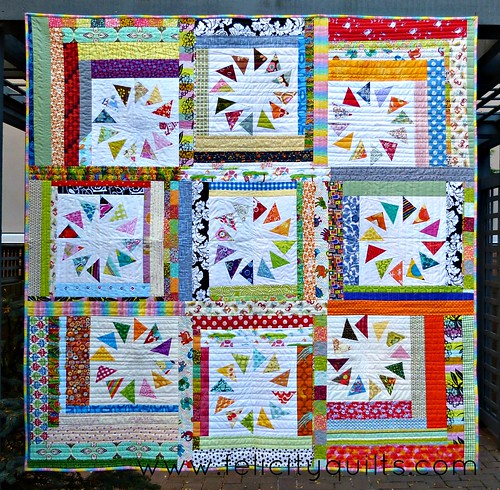
The quilt is the biggest I've made - 87"x101" and I wasn't able to use my usual strategy of pinning the quilt to the wooden arbours in our courtyard (seen above) for photography purposes. Instead, I had my husband hang it over the railing of our top balcony.

Liberty Goes to the Circus

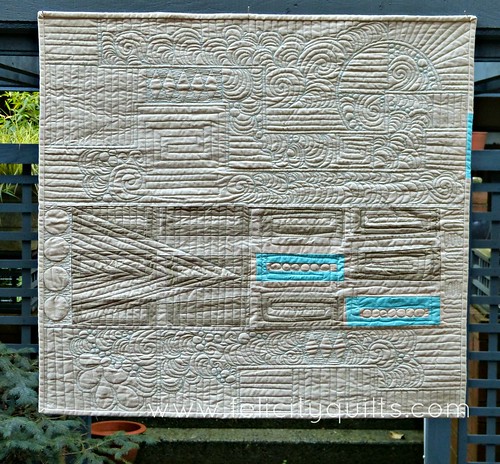
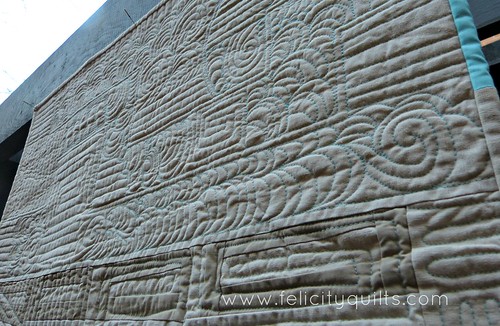
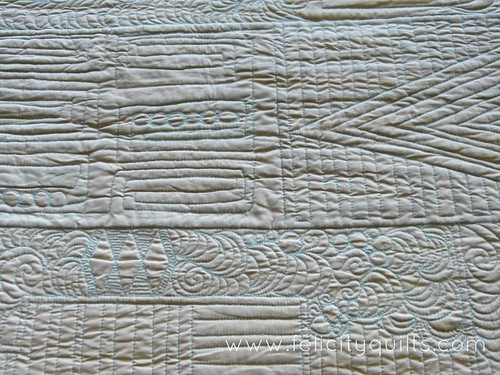
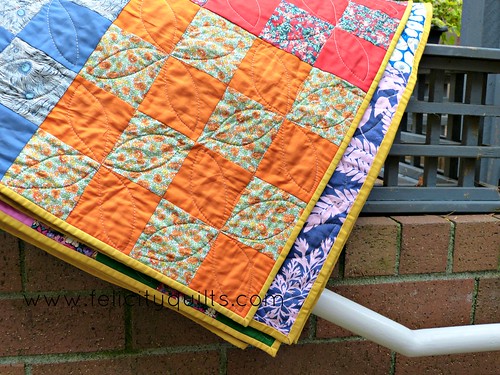
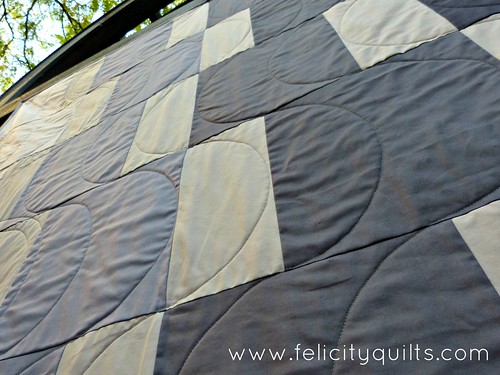
It's free-motion quilted with an neutral(ish) Aurifil thread in 40 wt (colour 2324) in a petal/leaf motif in each square.

Liberty Goes to the Circus quilted block

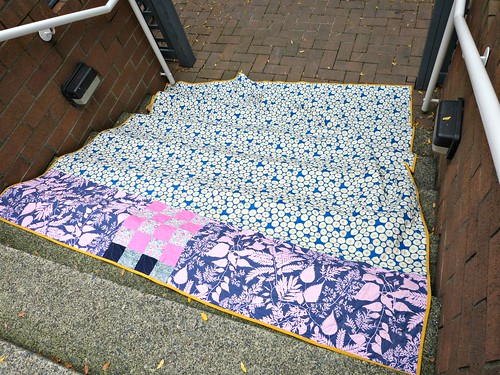
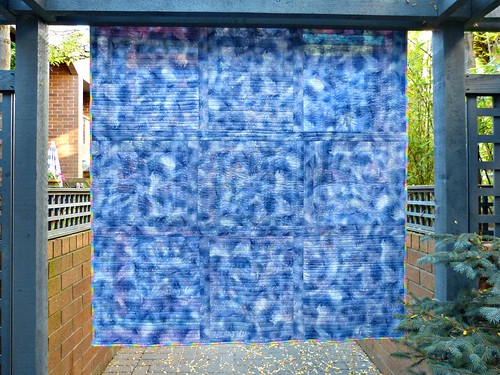
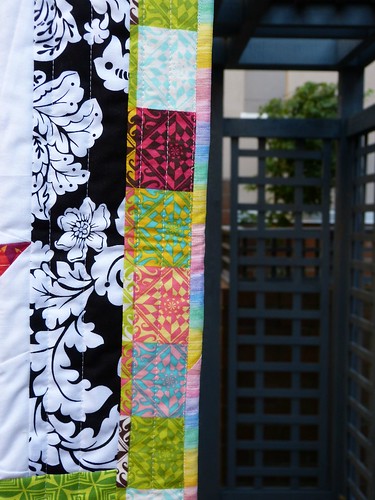
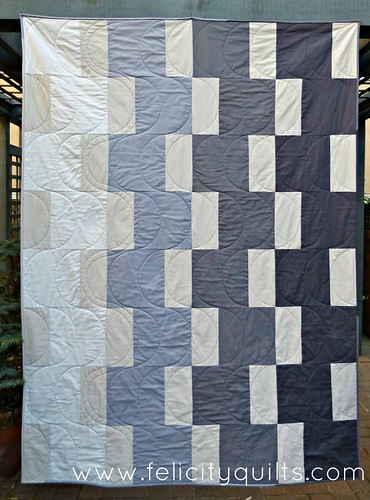
The backing is a fabulous Martha Negley print plus a little bit of Jay McCarroll Habitat and an extra block.

Liberty Goes to the Circus back

I was originally going to use a dark solid of some kind as binding, but instead I went with a favourite "neutral" of mine - Kona Curry. It is a surprisingly versatile shade, and provides a nice pop of colour there (like this thing needs more colour ha ha) along the edge. Plus, this lighter shade will wear a little more nicely than a darker fabric that will fade after many washings.

Kona Curry Binding

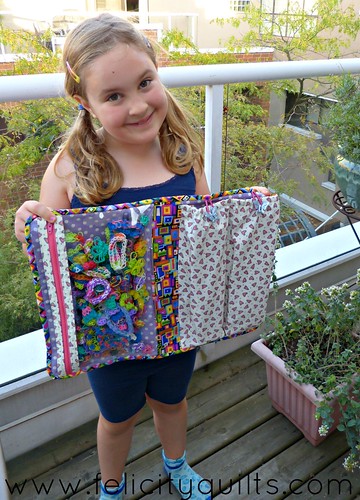
I puffy heart love this quilt, and it's mine alllll mine. Except when the kid steals it for afternoon reading/snuggling purposes.

Liberty Quilt + arbour

Thanks for stopping by for the Bloggers' Quilt Festival! This quilt is entered in the Large Quilt category.

AmysCreativeSide.com

Saturday, September 13, 2014

Road Trip Case

The Road Trip Case is a really fun, practical project for the Rainbow Loom lover ("loomatic" as G says) in your life. The pattern, by Anna Graham (Noodlehead) , is very well-written with good diagrams.

I was a teensy bit afraid of the vinyl, but it all worked out beautifully. The pattern deals with it in a very simple, clever way. I put some clear tape on the bottom of my presser foot for when I was sewing on top of the vinyl and it was really fine.

Road Trip Case inside

I quilted the exterior (not that you can see the stitches) and used a variety of bright, fun fabrics.

Road Trip Case exterior

G loves it and immediately filled the clear pocket with all of her Rainbow Loom makes. Success!
Road Trip Case

This is a Q3 Finish Along finish - yahoo!

Finish Along 2014

Saturday, September 6, 2014

Love is All Around

Love is All Around

This is one of my oldest WIPs. In late 2010, I asked my bee-mates from the Sew & Bee Happy bee to make me Circle of Geese blocks. I tucked them away until I joined the Finish Along and took stock of my WIPs and made a plan to tackle them.

When I pulled out these blocks to work on them, I realized why they'd sat. Such is the challenge with bees - the quality of the blocks you receive can definitely vary. And so these blocks proved to be quite challenging to work with. A traditional setting, even with sashing, wasn't going to work.

Love is All Around _up

I thought about putting the Circle of Geese blocks at the centre of some scrappy log cabin blocks. At one point, Quilt As You Go occurred to me, and then I remembered a block that I'd pinned for my DIY sampler by toefeather, and the layout was perfect!

Love is All Around _front

I did do QAYG, following Marianne's tutorials for stitch and flip strips, as well as how to join the blocks using wider joining strips. I chose a backing fabric that would blend nicely when all the pieces were put together.

Love is All Around back

The quilting is quick, simple, organic straight lines using white Aurifil 50 wt, which is a dream to stitch with. I used it all throughout this quilt's construction.

Love is All Around closeup

The QAYG technique definitely doesn't save time, but I must say that this is the squarest quilt I've ever made so there's that! The binding was chosen by G and deemed appropriate for the quilt's recipient: her 5-year old cousin.

Love is All Around binding

The finished quilt - before washing - is 60" square. I'll likely use the QAYG technique again - it certainly makes handling the bulk of a large quilt a lot easier. I'm happy to have a Q3 FAL project done.
Love is All Around


Finish Along 2014

Monday, August 25, 2014

Miss Kate in the Stars: a Mini

So the VMQG had a mini quilt swap just within the guild and - you guys - I'm powerless to resist a guild swap. POWERLESS!

This was the kind of swap where you're making for someone but you don't know who's making something for you. I made this mini for the lovely and very talented Jade Stitch Mischief who's currently rocking the house in Sewvivor.

Jade's swap questionnaire had Bonnie and Camille at the top of her "favourite designers" list, and then right after reading that, I saw that she'd re-grammed a giveaway for some Miss Kate with the hashtag "ilovemisskate." Well it just so happened that I had a charm pack of Miss Kate curing in my stash! Kismet!

Miss Kate in the Stars

I adapted this lovely block by Judy Martin called Star Struck so that I could use charms without trimming them down and so I didn't have to calculate corner triangles for flying geese, and came up with the mini I called Miss Kate in the Stars.

When it came to quilting, I chose to FMQ the crap out of it - lots of loopy loops here.

Miss Kate quilting closeup

Miss Kate closeup

And some tiny feathers to highlight that centre pinwheel.

Miss Kate Mini quilting

I'm absolutely delighted to say that Jade loved it - I'm sad that I wasn't at the meeting to give it to her in person, though. I had so much fun making this mini, which finished at about 18" square.

Does your guild do swaps? You should totally join up if they do. They're a great way to stretch yourself creatively and to get to know your fellow guild members. Go for it!

Thursday, July 31, 2014

Modern Shadow: An Off-list Finish

It's too hot around here and as a result, I've been too cranky to sew, so I think I'll blog instead!

This is one of those projects that just popped into my head, demanding to be made. As I fell asleep one night a couple of months ago, I saw my pattern Easy Going Modern made up in an ombre arrangement.

Modern Shadow front

So I went to my stash and dug around in my greys and pulled 5 shades of Kona Solids: Silver, Medium Gray, Coal and Charcoal plus Ash.

Modern Shadow

I got a bit stuck on the quilting, but I'm glad I didn't rush into anything because this curvy motif - done with two different shades of grey Aurifil 50 weight thread - really complements the right angles.
Modern Shadow quilting

Modern Shadow upward

The backing is a fabulous IKEA duvet that I thrifted.
Modern Shadow back

This finish was a just-for-fun one - "off-list" meaning it's not part of my Finish Along list. But I think I may be keeping this quiltie for myself because it's a nice lap size - about 56"x78".

Linking up to Finish it Friday over at Crazy Mom Quilts!