

Welcome to my date in the Blogger Block of the Month organized by Dhia Peach Patch Quilts! I'll be sharing a tutorial for a block of my own design, which I call Through the Window.

2 @ 1½" x 4"
2 @ 1½" x 6"
1 @ 1½" x 9"
1 @ 1½" x 9½"
Fabric B (yellow in example):
2 @ 2" x 6"
2 @ 2" x 9"
Fabric C (blue floral in example):
1 @ 4" x 4"
Note: seam allowances are ¼".
1. Starting with the 4" x 4" square, stitch one 1½" x 4" strip to the top and bottom. Press toward the darker fabric.

2. Attach a 1½" x 6" strip to opposite sides. Press toward the darker fabric.

3. Attach the 2" x 6" strips to the sides of the unit with the two seams (so not the same side where you added the last strip). Press toward the strips you just added.

4. Attach the 2" x 9" strips to the opposite side. Press toward strips you just added.

5. You've just made a simple log cabin block. Press it well and square it up to 9" if you want.

6. Slice the log cabin in half down the centre.

7. Insert the 1½" x 9" strip by stitching each half of the block to either side of the strip. Press toward the strip.


8. Slice the block in half again, perpendicular to the strip you just added. Insert the 1½" x 9½" strip by stitching each half of the unit to either side. Press.

10. You're done!

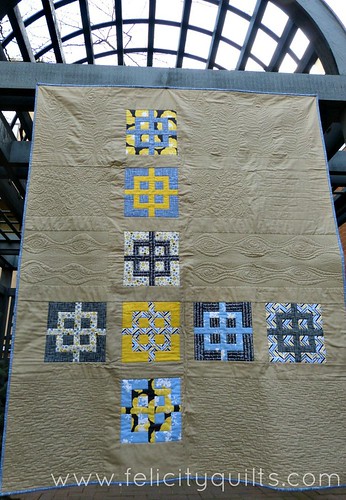
This block can be made with a lot of different fabric combos. When I used it in my Madrona Road challenge quilt, I used the same fabric for B and C, and I tried to achieve high contrast between the A and B/C fabrics:
Here it is on point, using lovely fabrics that Dhia sent along, and in a scrappier layout with two different fabrics for the A and B pieces. I will be donating this block to Margaret's Hope Chest:

Be sure to visit the other bloggers participating in the Blogger BOM:
|
|
|
|
| |
|
| |
|
| |
|
| |
|
| |
|
| |
|
| |
|
| |
|
| |
|
| |
|
| |
|
| |
|
| |
|
|
Thank you, Dhia, for inviting me to participate in this BOM series!
Nice job! Love the block, your tutorial is well written and clear, and the expamples are lovely!
ReplyDeleteGreat tutorial, Felicity!! So pretty.
ReplyDeleteHI!!! Very pretty block!!! I love all the ways you used it!!! Thanks for the tutorial!!!! I am behind on the hop but I am planning to catch up soon!!!
ReplyDeleteLove this block, made it for a charity quilt challenge.
ReplyDeleteCame out great-added sashing to make it 12" block. It looks like the block on your quilt is larger? Do you have directions
for 12" block!
Hello! I am going to answer your question here, jemfl, because your email address is not available via your blogger profile.
DeleteI'm delighted to hear that you made my block for a charity quilt challenge! I'd love to see a photo if you have one - you can email it to me (my email is in my profile and in the About Me page here on the blog).
The block in my quilt is the same size as per the tutorial - 9" finished. I haven't had the opportunity to figure out instructions for a 12" finished version yet.
Nice article. thanks for share this. i like your blog commenting this post. we also provide best buy quilts online india for more information visit on our website.
ReplyDelete