
Yippee! I am so happy to be rounding out the Christmas in July blog hop and giveaway series. There have been some absolutely fabulous projects featured, not to mention great giveaways.
Today I'm sharing a tutorial for this festive pillow cover. It finishes at about 18” square. Stuff it with a 20” pillow form to make it nice and plump!

The giveaway on this stop is a $50 gift certificate from Fat Quarter Shop. Awesome, right? Tutorialand giveaway details (giveaway closed) can be found after the jump...

Today I'm sharing a tutorial for this festive pillow cover. It finishes at about 18” square. Stuff it with a 20” pillow form to make it nice and plump!

The giveaway on this stop is a $50 gift certificate from Fat Quarter Shop. Awesome, right? Tutorial
To enter the giveaway for a $50 gift certificate from Fat Quarter Shop, simply leave a comment on this post, one per person. One winner will be chosen randomly using Random.org. Please make sure that there's a way to contact you should your name be the one chosen. Giveaway open until Saturday July 28, 2012 at 10:00 am Pacific.Giveaway now closed and winner chosen. Thank you!
Holly Berries Pillow Cover Tutorial
Materials:
1 Fat Quarter EACH of three fabrics: background, red and green
20” square of fusible fleece (I used Pellon TP971F Fusible Thermolam Plus) OR 20” squares of batting and muslin
20” zipper with plastic teeth
Glue stick
Instructions:
CUTTING
Background Fabric (cut in this order):
1. Cut one 6½" strip along the long side of the FQ (21"-22"). From it, cut one 6½" square.
2. From the remaining 6½" strip, cut two 2½" strips and one 1½" strip.
3. Cross-cut the 2½" strips into 2½" squares (yield should be five per strip for a total of ten 2½" squares).
4. Cross-cut the 1½" strip into:
- one 1½"x6¼" strip
- two 1½"x2½" rectangles
5. Cut five 2½" strips along the long side of the FQ and cross-cut into:
- four strips 2½"x10½"
- nineteen 2½" squares
Green Fabric:
1. Cut four 2½" strips along the long side of the FQ (21"-22"). Cross-cut into:
- sixteen 2½" squares
- eight 2½" x4¼" rectangles
2. Set aside the remaining strip (approximately 8"x21") for the pillow back.
Red Fabric:
1. Cut two 2½" strips along the long side of the FQ (21"-22"). Cross-cut into:
- twelve 2½" squares
- one strip 2½"x6¼" then trim down to 1½" wide
2. Set aside the remaining piece (approximately 13"x21") for the pillow back.
Separate the pieces you cut into the following:
Background
|
Green
|
Red
| |
Holly panel
|
1 square 6½”x6½”
13 squares 2½”x2½”
1 strip 1½”x6¼”
2 rectangles 1½”x2½”
|
8 squares 2½”x2½”
8 rectangles 2½”x4¼”
|
1 strip 1½”x6¼”
|
Inner Frame
|
4 strips 2½” x10½”
|
4 squares 2½”x2½”
| |
Outside Checkerboard Frame
|
16 squares 2½”x2½”
|
8 squares 2½”x2½”
|
8 squares 2½”x2½”
|
PIECING
Holly leaves:
1. Take the 8 green 2½” squares, fold each in half on the diagonal and press. Optional: use glue stick to keep the raw edge corners together.
2. Take the 8 green 2½”x4¼” rectangles and fold half, matching the 2½” edges and press.


6. Stitch the sets together in pairs along the lined-up raw edges to create a total of FOUR 2-patch units. Press seams open.

7. Stitch the 2-patch units together in pairs along the long sides to create TWO four-patch units. Press seams open (they will be bulky – just do your best!).

8. Pair a flying geese unit with a four-patch and stitch together. Repeat for other units.

Holly Berries (with partial leaves) block:
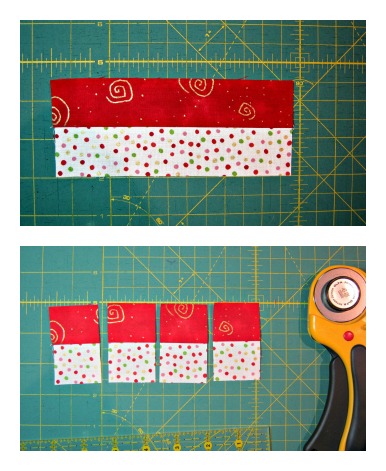
1. Pair the 1½”x6¼” strips of background and red and stitch along the length. Press seam open or to the side; whatever is your preference. Note: the strip is cut generously in case your stitching is imperfect like mine. Cross cut into FOUR units 1½” wide.

3. Pair a green folded triangle with EACH one-'berry' unit, positioning the folded triangle’s raw edged corner opposite the red square. Baste together along the triangle’s raw edges with glue stick. Repeat so that you have two units with a red square in one corner and the green folded triangle covering the other.

4. Pair the last TWO green folded triangles with the last ONE background 2½” square, butting up the folded edges along the background square’s diagonal. Baste together along outer edges using glue stick.

5. Arrange the units as shown and stitch together to create a four-patch, pressing seams open.

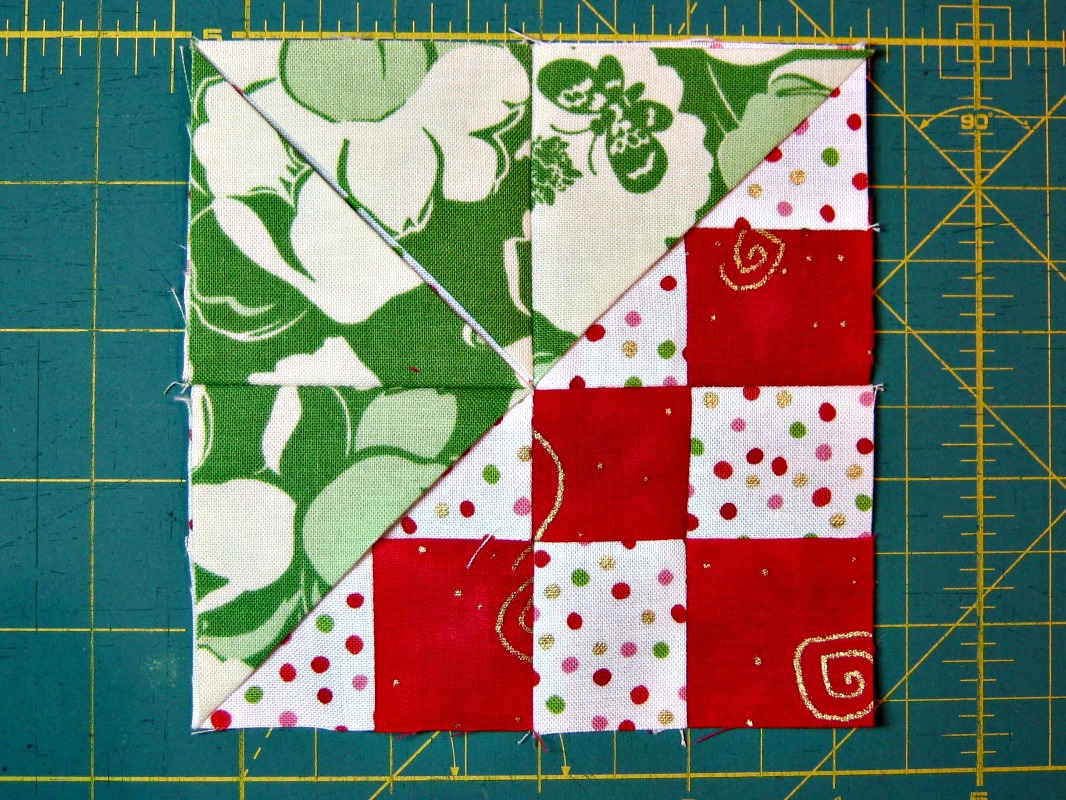
Holly Panel:
1. Piece the two holly leaf units, the holly berries (with partial leaves) unit and the 6½” background square to create the Holly Panel.


3. Stitch TWO red 2½’ squares to the ends of TWO 2½”x10½” background strips.


Create and Add the Outer Checkerboard Frame:
1. Pair EIGHT green 2½” squares with EIGHT 2½” background squares, stitch and press seams. Pair FOUR red 2½” squares with FOUR 2½” background squares, stitch and press seams.

3. Stitch a background 2½” square to the green square on the end of the strip, and repeat until all four strips have background squares at both ends.


Finish the Front:

2. Holding that flap back with your fingers, stitch it down beginning at the corner and following the edge of the curve. (You may want to use a seam ripper or similar pointy thing to hold down the corner for the first stitches.)

3. Once you get to the end of one flap, just stop with the needle down, pivot, fold down the next flap and keep stitching. The square “flaps” on the sides won’t have as much stretch since they’re not folded on the bias, but you should be able to stretch them back enough to stitch down and create a mild curve. Backstitch at the very beginning of the first flap and the very end of the last flap.

4. Trim or bury your threads and now your pillow front is done!
QUILTING
1. If you’re using fusible fleece, fuse the framed Holly Panel to the 20” square of fusible fleece following the directions for the product you are using. If you’re using regular batting, layer the pillow front, batting and muslin and baste.
2. Quilt as desired. Here's what I did with my quilting:


3. Trim all around the edges of the piece, which should measure around 18½" square.
FINISHING
Making the Zippered Pillow Back:
1. You should have more than enough of your green and red fabric left over to use as the pillow back. To double check, take the fabric pieces and place them together on a flat surface. Lay the Pillow Front on top and see that the red and green fabric extend past the pillow top by at least an inch on all sides.

(Note: don't get confused by the different green fabric in the photo. I ran out of green fabric before making the pillow back because I had zero forethought and used only green scraps for the pillow front.)
2. Decide whether the green or the red fabric is going to be on the top part of the cover. I chose green. Fold up the bottom edge of the green fabric 1" and press.

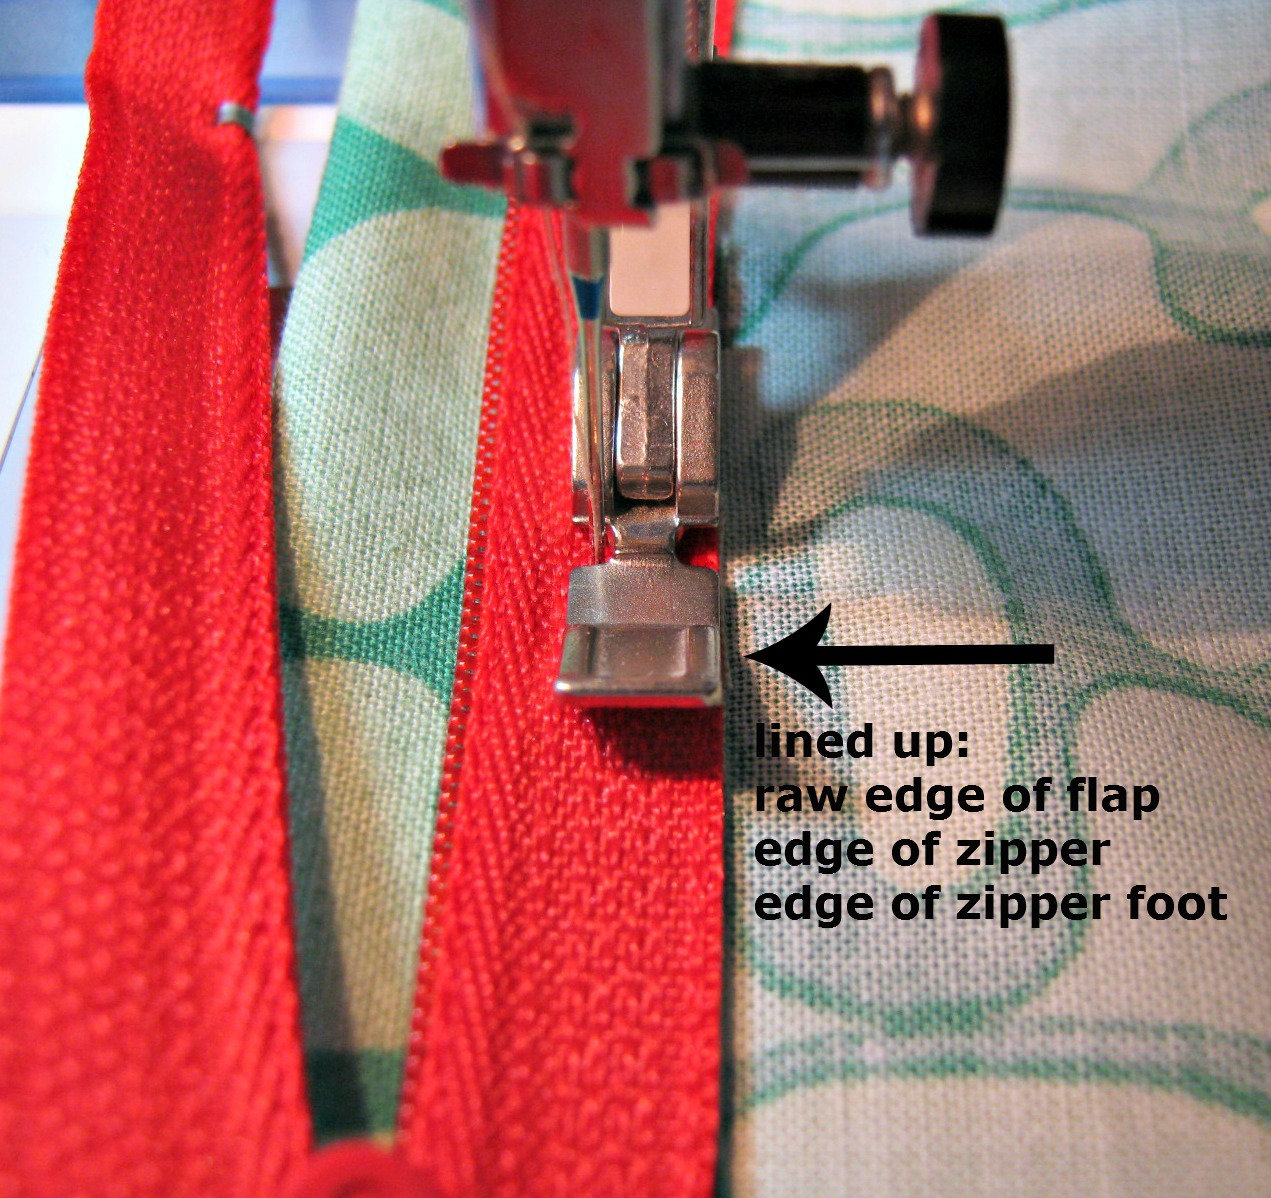
3. Take the zipper, open it a few inches, and lay it FACE DOWN on the raw edge of the flap. This is on the wrong side of the fabric.

4. Put your zipper foot on your machine, and holding the zipper in place with your fingers, line up the zipper foot with the flap's raw edge and the zipper tape, and begin stitching the zipper down.
5. When the zipper foot gets close to the zipper pull, stop with your needle down and slide the pull out of the way, closing the zipper at the same time.

6. Keep stitching to the end of the zipper tape. It likely won't be the same length as the fabric; don't worry about it. We'll trim later.
7. Fold back the zipper flap and pin it. Unzip the zipper about 5-6 inches. Then take the other leftover fabric that will be the bottom half of the pillow cover (red in my case), and line it up right sides together with the other side of the zipper, matching the zipper end with the side edge of the fabric.

8. Still with the zipper foot, stitch the fabric to the zipper, keeping the edges lined up, and remembering to stop with the needle down, and zip up the zipper when you get close to the zipper pull.

This photo shows the last couple inches of stitching, which ends near the zipper end.
9. Press the bottom fabric back away from the zipper, and remove the pins holding the flap back. Press on the right side. (Congrats: you just made a pillow back with a covered zipper!)
10. Open the zipper halfway, then lay the pillow back right side up on your cutting mat, making sure both rows of zipper teeth are still close together so that your pillow back isn't distorted. Use a pin if you need to.

11. Place the Pillow Front face down onto the back, right sides together. Adjust the location of the Pillow Front so that:
- the backing extends beyond it on all sides;
- it lines up nice and straight with the pillow back (use the edge of the flap as your guideline);
- the metal bits at the zipper's top and bottom are located anywhere BESIDES exactly ¼" inside the edge of the pillow front or exactly even with the edge of the Pillow Front (so you don't hit them with your rotary cutter or needle in the next steps).

12. Using a rotary cutter, trim off the excess pillow back using the edge of the Pillow Front as a guide. Go ahead and cut right through the zipper.
13. Pin all around the edges, taking care not to disturb the pieces.
14. Stitch all around the pillow cover with a ¼" seam allowance.
15. Turn through the opening you created by opening the zipper halfway, poke out the corners with something pointy-ish like a chopstick, stuff with pillow form, and ENJOY!


I hope you were inspired by this tutorial to make a Christmas gift for yourself or someone else. Don't forget to enter the giveaway and thanks for stopping by!
what a great idea! i love seeing christmas in patchwork
ReplyDeleteLove that curve to holly leaf - great technique, Felicity! Thanks for the tutorial and giveaway!
ReplyDeleteThis pillow is really snowy. I can see some snow flakes already here ;)
ReplyDeleteThanks
Susanne
That's a very generous giveaway, would love to win!:)
ReplyDeleteandri_chama(at)yahoo(dot)com
I love your pillow! I would like to make one as a gift and also make another cover that could be used year round so the gift recipient could swap the cover after the holidays. Thanks for sharing!
ReplyDeleteI like the faux cathedral window look. Thanks for sharing the tutorial and the giveaway.
ReplyDeleteThanks for such a detailed tutorial. The pillow is really cute.
ReplyDeleteSad to see the Christmas in July blog hop come to an end. Love the pillow! Would love to win some fat quarter shop fabric. Thanks for the opportunity.
ReplyDeleteReally cool tutorial! As I was reading through the first part, I was thinking, why is she having us fold all the green pieces for the holy leaves and then I got to the part where you create the curves. Brilliant!
ReplyDeleteThanks for the giveaway and the chance to win.
(supermomnocape at yahoo dot com)
Amazing Tutorial!! Beautiful!!! :)
ReplyDeleteLOVing this Christmas Blog Hop too ... been a great morning read over a coffee!
:)
Thanks for the great tutorial. I love the way you did the holly leaves. It's really very clever. I can't wait to try it.
ReplyDeleteThanks for the great tutorial - I especially like the border! Thanks, too, for the chance to win this fabulous gift certificate!
ReplyDeleteGreat tutorial! Thank you. The holly leaves are really fun!
ReplyDeletecute! love the holly leaves!
ReplyDeleteThat is so cute. I really like the berries. I may have to try this design. Thanks for the tutorial.
ReplyDeleteVery detailed tutorial. Thanks and thanks for the giveaway.
ReplyDeleteThanks for the tutorial and love how you did the leaves,fantastic!!
ReplyDeleteI love your pillow. Thanks for tutorial. Im going to have to make one.
ReplyDeletequilting dash lady at comcast dot net
Thanks this will jump start my xmas sewing, I was stumped on where to start and this is perfect..
ReplyDeleteThe holy leaves look awesome! I love the detail of the tutorial, this makes me feel like this project is very doable. Good job!
ReplyDeleteThanks for sharing this fun tutorial! Love the pillow, I'll have to make one. =)
ReplyDeleteThis is a really well done tutorial!
ReplyDeleteLove the tutorial! Thanks!
ReplyDeleteGreat tutorial. Good to think about Christmas now since I'm a last minute kind of girl. Maybe this year I'll reform!
ReplyDeleteThanks for a great tutorial!
ReplyDeleteNo excuses now for last minute sewing!!
Adorable pillow!! Thanks for the chance to win this AWESOME giveaway!!
ReplyDeleteSuch a cute pillow! I really like how you got the curved edges on the holly. Great idea!
ReplyDeleteFabulous tutorial!! Thank you so much for that and this pillow as well. The pillow is simply beautiful and would be welcome on anyone's sofa during the holidays. I love it. Thank you again.
ReplyDeleteAhhh your pillow is so cute and cheery! Thank you for the tutorial!
ReplyDeleteThanks for the tutorial & the generous giveaway! (EMAIL: marshudson at comcast dot net)
ReplyDeleteGreat tutorial thanks for sharing.
ReplyDeleteYou are so, so clever Ms.Felicity! I love your Holly pillow design and I can think of one person we both know who will be making this FOR SURE! Great tute with lots of clear photos. I could do some damage with $50 at the FQ Shop fer sure. Thanks!
ReplyDeleteThanks for this project, Felicity! Love your work :)
ReplyDeleteWhat a cute pillow! Thanks for sharing :)
ReplyDeleteNever thought about making the holly that way. Thanks, I like the pillow.
ReplyDeleteA great tutorial!! Looks like a great cover to make for my pillows on my sofa!! Christmas is coming...
ReplyDeleteYour quilting on the pillow is amazing!
ReplyDeleteWhat a nifty way to make the curves on your holly!! Great festive pillow. Thanks for a fun hop and the chance at wonderful giveaways.
ReplyDeleteLove the polka dot fabric you used! eatkin85@yahoo.com
ReplyDeleteSo clever and cute ! I love using pillow covers so that you can just switch out the pillow forms every season !
ReplyDeleteThat holly is so cute, I really need to make this pillow!
ReplyDeleteGreat tutorial. Thanks!
ReplyDeleteLove the detil on the leaves. It is now on the list to make for Xmas.
ReplyDeleteBonnielarson58@gmail.com
You did a very neat job with your zipper in the back. I struggle with zippers and avoid them as much as possible, so I usually just have an overlapping closure in my pillows as well. Thanks for the great tutorial.
ReplyDeleteSuch a cute pillow! Thank you for the tutorial!
ReplyDeleteThat pillow is so cute.
ReplyDeleteWhat a cute pillow! Thank you for the tutorial and giveaway!
ReplyDeleteI love the covered zipper back - it seems so easy now! And, of course, the holly leaves are so cute. Thanks!
ReplyDeleteWhat a great idea and tutorial Felicity! I've made folded maple leaves, but never thought of holly! And I love the funky green fabric on the back ... I have it in orange ...
ReplyDeleteI was suprised by the fabric used for the holly leaves -- the pattern looks so different on the pillow. Thanks for the tutorial.
ReplyDeleteReally well done tutorial for such a cute pillow. thanks for sharing.
ReplyDeletedarling pillow--very clever!!
ReplyDeleteThanks for the clever pillow tutorial.
ReplyDeleteI really like the green adn white fabric you selected for the holly leaves. This looks just like wild Florida holly - though snow is infrequent here. Thanks for the nice tutorial.
ReplyDeleteGreat idea to use the faux cathedral windows for the Holly leaves! You've picked one of my favourite holiday themes! ;)
ReplyDeleteI like the hidden zipper! Thanks for the giveaway!
ReplyDeleteThanks for the great tutorial and chance to win :)
ReplyDeleteI really like the tutorial on the pillow. I need to work on pillows between quilts; fun project.
ReplyDeletetilleybl@aol.com
I've loved all the projects on the blog hop and hope to make a bunch of them. Would love to win the GC to FQ Shop ~ the 28th is my birthday!
ReplyDeleteLovely pillow and your tutorial is amazing. I love the detailed photos and notes along the way. Thanks for showing putting in the zipper as well. Great holiday pillow.
ReplyDeleteThank you and FQS for a generous giveaway and a chance to win.
usairdoll(at)gmail(dot)com
Beautiful pillow - thanks for the tutorial! And thanks for the chance to win!
ReplyDeleteI love this, Felicity! Great job!!
ReplyDeleteGreat pillow!! Thanks for the tutorial!! I love the zipper instructions. That is always the trickiest part for me :)
ReplyDeleteThere's so much Christmasness going on this month -- it's fabulous!
ReplyDeleteWhat a clever variation on the cathedral windows and it makes the best holly leaves! Thank you for the tutorial.
ReplyDeleteLove the pillow fabrics, will look great for christmas.
ReplyDeleteThis has been one of my favorite blog hops to date. Love the pillow tutorial!
ReplyDeleteThose leaves are very clever! Almost like faux cathedral windows. :) Thanks for the tutorial and the giveaway!
ReplyDeletelove the stylized berries! i am such a zipper chicken though ;)
ReplyDeleteWhat a great pillow! Thanks for the tutorial! :) And thanks for a chance to win! :)
ReplyDeletebcgeates at netbistro dot com
Very charming. It's never too early to be thinking about Christmas, right?
ReplyDeleteThanks for the giveaway.
wordygirl at earthlink dot net
The dottie fabric you used looks so very festive!
ReplyDeleteDeborah
homemakerhoney@ gmail .com
I love your Holly Berries pillow, I want to make one.
ReplyDeleteThe curves on those triangles and squares is awesome!
ReplyDeleteWould love to win the give away, loved the tutorial!
ReplyDeleteThanks for a detailed tutorial. I'm inspired to make one!
ReplyDeleteThank you for the tutorial, especially the zipper part. I didn't realize how easy it was to put in a hidden zipper!
ReplyDeleteI love the pattern and thanks for the great tutorial.
ReplyDeleteLove the pillow - thanks for the tutorial. And thanks for the giveaway.
ReplyDeleteAbsolutely "awedorable"! Love the way you made the holly leaves - so creative and your use of non traditional fabrics Christmas fabrics. So smart!
ReplyDeleteGreat tutorial. I appreciate all the pictures and detailed instructions. Thanks for sharing and for a chance at your giveaway.
ReplyDeleteok, this is just too darn cute. I am pulling fabric right now to make it. My kids would love to have a set of these for Christmas to put in their houses. I am always impressed with the creativity of you bloggers. I could never come up with all these awesome ideas. Thank you for your creative genius and for sharing what you love.
ReplyDeleteThank you so much for the really clear instructions on how to insert a zipper.
ReplyDeleteMy aim this year is to try stuff that has frightened me in the past.
Zippers are on the list.
Wish me luck. LOL
Cheers
Lush
London, UK
Love the cushion with the holly which has the 'faux' cathedral curves so handy then the berries. Love dotty background plus the detailed tutorial.
ReplyDeleteThank you for the generous giveaway.
zuzanzap(at)gmail(dot)com
Oh this is SO CUTE! Just by the picture I thought "I can make a bunch of these as gifts" but then it looks a little more involved once I got to the instructions. I'm a beginner at piecing but I just may try to make one for myself. Great tutorial!
ReplyDeletekakingsbury(at)verizon(dot)net
Those dots are wonderful! Great tutorial for the zipper and cathedral leaf.
ReplyDeleteThank you for a wonderful tutorial! The pillow is fabulous!!!
ReplyDeletesuch a great design and love the clear directions!!!
ReplyDeleteWhat a great way to make the curved leaves. Thanks for sharing, I love the pillow.
ReplyDeleteThank you for a giveaway!
ReplyDeleteYour pillow is cute!
Halochka.
gboshko at gmail dot com
Adorable pillow!Thanks for the tutorial and the chance to win!
ReplyDeleteExcellent tutorial - and such a generous giveaway!
ReplyDeleteHow cute is that pillow cover! And what an excellent tutorial - thank you!
ReplyDeleteLove the pillow tutorial-- especially the rolled leaf points!! I also like the use of the dotted fabric for the background! :-) Thanks for the chance to win your giveaway!! and thank you for the tutorial!
ReplyDeletecute pillow! great way to put some holiday flavor around the house.
ReplyDeleteWhat a wonderful pillow! I love all things Christmas and look forward to make one of these as a gift! Thank you for such a well-written and visual tutorial!
ReplyDeleteI really like the idea of a pillow cover instead of a pillow. That way I could put covers on all my pillows just for the holidays and then take them off afterwards...I just don't have room to store things like entire pillows and quilts that are only seasonal like that, so I've never made one! Thanks for the tutorial!
ReplyDeleteThanks for the tutorial! Cute pillow!
ReplyDeletenice tutorial!! that's a pretty amazing prize your giving away! Thanks for the chance :)
ReplyDeleteLove your holly berries pillow and the tutorial.Thank-you very much. Becky
ReplyDeleteThanks so much for the great tutorial!
ReplyDeleteWhat a great pillow! I need to make like 10 of them... Maybe this weekend??
ReplyDeleteAwesome tutorial, and what a generous giveaway! Thanks for the chance to win
ReplyDeleteThanks for the great project idea!
ReplyDelete