
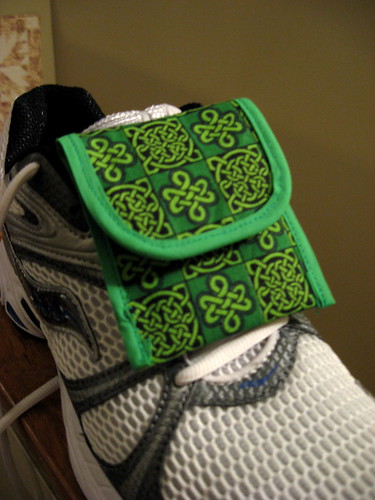
An unfortunate incident involving an open-top toddler purse that said toddler was swinging around in an arc, a walk around the block and Kevin's shoe wallet has resulted in the need to make a new shoe wallet, so I thought I could do a tutorial at the same time. This nifty thingy (technical term) attaches to the shoe's laces and holds a credit card and some cash.
- fabric
- bias tape in a coordinating colour (3/8" double fold works best - the stuff I used here is too wide and caused some problems) - you'll need about a 24" length.
- 3/4" wide sew-in hook and loop tape (Velcro)
- the usual sewing supplies - rotary cutter and ruler, thread, sewing machine, sturdy needle, a few pins

Step 1 - Cut fabric
Press your fabric and cut a 2½" by WOF strip. From that strip cut:
3 @ 2½" x 9" strips (for wallet)
1 @ 2" x 1-3/4" piece (for back tab)

From the velcro cut
1 @ 1½" piece of EACH hook and loop bits
1 @ ½" piece of EACH hook and loop bits

Step 2 - Make the Back Tab
Take the back tab piece of fabric, and press in 1/4" from all 4 sides.
Press in half along length, wrong sides facing and top stitch all the way around.
Attach the fuzzy/soft piece of ½" hook and loop tape to the bottom of the tab.

Step 3 - Attach Back Tab
Measure 3" from the bottom of one of the strips of fabric, and fold wrong sides together at that point so that you've folded up 3" and the fabric strip is now 6" long. Place face down and then measure up 1" from the fold. Center the other side of the velcro and hold it in place as you bring the strip of fabric to the sewing machine. Unfold the fabric strip and attach the velcro.
Figure out where to sew the back tab by placing it over the velcro, then sew along the topstitch seam at the top to attach the tab to the strip of fabric. This strip is now the outside of the wallet.

Step 4 - Attach Fastener Hook and Loop Strips on Pocket and Flap
Fold the outside strip of fabric up 3" again to create a pocket, then place one side of the 1½" piece of Velcro 1" from the edge of the fabric. Unfold the fabric strip, then attach the Velcro to just the single piece of back fabric.
Take a different strip of fabric, place it right side facing you and measure ½" from the top, and attach the other side of Velcro there. This is going to be the inside of the wallet.

Step 5 - Construct the Wallet
Layer all three pieces of fabric together in the following order:
- Inside piece, right side down, velcro fastening at the top.
- Middle piece (direction doesn't matter since it's not going to show - it's just for stability).
- Back piece, right side up, velcro fastening at the bottom.
Cut a piece of bias tape 2½" long and encase the bottom end of the strips, and sew everything together. Raw edges don't matter; you'll be finishing the sides later.

Fold up the bottom 3" and zig zag the wallet together along the sides of the pocket to keep them all together.

Step 6 - Finish Outside of the Wallet
Cut curves on the wallet's flap. I did it by eye and rounded the corner at about ½" from the top and side.

Enclose the wallet's side and top edges in bias tape. Starting at the bottom of one side of the wallet, fold under about ½" of bias tape, fold it again and line it up with the bottom of one side of the wallet. Sew the bias tape all the way around, being careful on the curved bits at the top flap. This is where slightly narrower bias tape would've worked better for me.
As you approach the bottom of the other side of the wallet, stop about 1½" from the bottom and cut the bias tape so that it extends about ½" from the wallet's bottom. Tuck it in so that it's even with the wallet's bottom, fold it over and finish sewing.

A different wallet because the other one didn't look as good. :(
Step 7 - Enjoy your new Shoe Wallet!

Very cool, thanks for sharing! sorry about the unfortunate incident...reading between the lines, I'm wondering, was wallet #1 totally lost?
ReplyDeleteCool Beans Felicity! A very cool gift for runners. I wonder if my little bro still runs...
ReplyDelete